February 18, 2025
Complete Guide to Implementing OAuth2 Authorization with Keycloak and Gatekeeper for Kubernetes Deployments

Annavar Satish
Author

Priyank Dhami
Contributor

Rakshit Menpara
Reviewer
A Look at OAuth2 with Keycloak
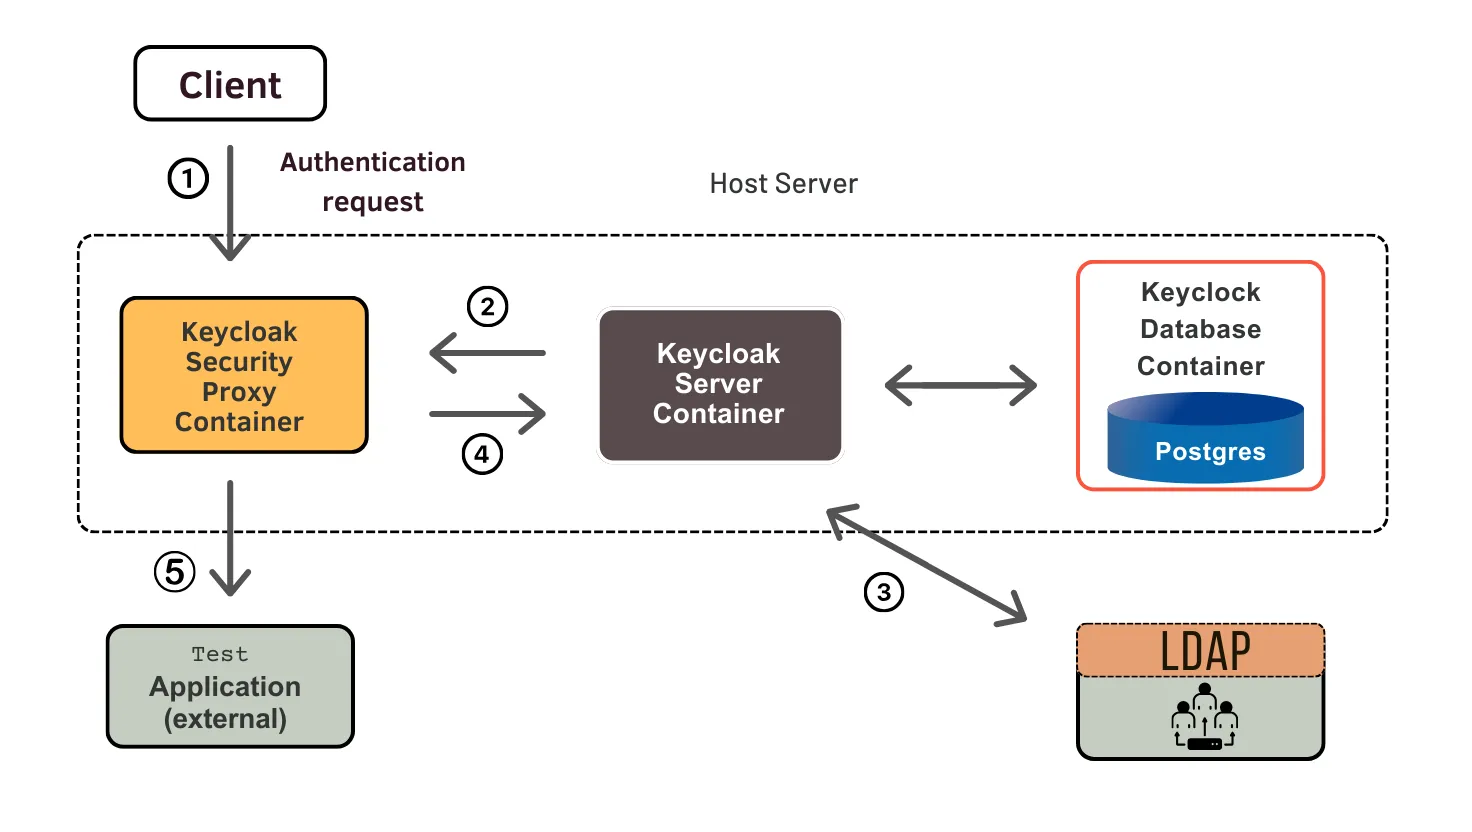
Modern microservices architectures require robust authentication and permission mechanisms to ensure the security of distributed applications. Keycloak’s OAuth2 authorization provides enterprise-level identity and access management (IAM) tools that work seamlessly with containerized systems.
Keycloak is one of the most complete open-source identity providers available today. It was made by the Red Hat JBoss community. It employs OpenID Connect (OIDC), OAuth 2.0, and SAML 2.0, which are all industry standards. This makes it an excellent choice for enterprises that want to manage authentication from one place without being bound to a single provider.
What Makes This Guide Unique
This detailed guide goes over more than just the basics. It also has production-ready ways to set up Kubernetes OAuth2 authentication, ways to make security stronger, and ways to make performance better that are made just for these situations.
Why Choose Keycloak Gatekeeper for Kubernetes?
What is the Keycloak Gatekeeper?
Keycloak Gatekeeper, now known as Louketo Proxy, is a simple authentication proxy that sits between your apps and users. It uses OAuth2 to control access without you having to update the code of your current services.
Container orchestration has a lot of benefits, such as:
Simplified Integration: As a sidecar proxy, Gatekeeper may authenticate any HTTP-based service, regardless of the programming language or framework it uses. This is not like regular authentication libraries, which need changes to the application level.
Design that works with Kubernetes: Gatekeeper was designed to work with cloud-native systems, and it works great with Kubernetes ingress controllers, service meshes, and container networking.
The Zero-Trust Security Model: Keycloak employs defense-in-depth to make sure that security is constantly enforced across your microservices ecosystem by evaluating every request against its centralized policy engine.
Comparison with Alternatives
| Feature | Keycloak Gatekeeper | Istio | Ambassador | Traefik |
|---|---|---|---|---|
| Learning Curve | Low | High | Medium | Medium |
| Keycloak Integration | Native | Plugin Required | Plugin Required | Plugin Required |
| Resource Usage | Minimal | High | Medium | Low |
| Configuration Complexity | Simple YAML | Complex CRDs | Medium | Simple |
Prerequisites and System Requirements
Technical Requirements
- Kubernetes Cluster: Version 1.19+ with RBAC enabled
- Keycloak Server: Version 15.0+ (standalone or containerized)
- Ingress Controller: NGINX, Traefik, or HAProxy compatible
- SSL/TLS Certificates: Valid certificates for production deployments
- Resource Allocation: Minimum 512MB RAM and 0.5 CPU cores per Gatekeeper instance
Knowledge Prerequisites
- Basic understanding of OAuth2 authorization flows
- Familiarity with Kubernetes deployments and services
- Experience with YAML configuration management
- Understanding of JWT token structure and validation
Setting Up Keycloak Server
Prerequisites: A PostgreSQL database
Kubernetes Keycloak Deployment
For production environments, deploy Keycloak on Kubernetes with high availability:
# keycloak-deployment.yaml
apiVersion: apps/v1
kind: Deployment
metadata:
  name: keycloak
  namespace: improwised-auth
  labels:
    app: keycloak
    version: "22.0"
spec:
  replicas: 2
  selector:
    matchLabels:
      app: keycloak
  template:
    metadata:
      labels:
        app: keycloak
    spec:
      containers:
      - name: keycloak
        image: quay.io/keycloak/keycloak:22.0
        env:
        - name: KC_DB
          value: postgres
        - name: KC_DB_URL
          value: jdbc:postgresql://postgres-service:5432/keycloak
        - name: KC_DB_USERNAME
          valueFrom:
            secretKeyRef:
              name: keycloak-db-secret
              key: username
        - name: KC_DB_PASSWORD
          valueFrom:
            secretKeyRef:
              name: keycloak-db-secret
              key: password
        - name: KC_HOSTNAME
          value: auth.improwised.com
        - name: KC_PROXY
          value: edge
        ports:
        - containerPort: 8080
          name: http
        readinessProbe:
          httpGet:
            path: /realms/master
            port: 8080
          initialDelaySeconds: 60
          periodSeconds: 10
        livenessProbe:
          httpGet:
            path: /realms/master
            port: 8080
          initialDelaySeconds: 90
          periodSeconds: 30
        resources:
          requests:
            memory: "1Gi"
            cpu: "500m"
          limits:
            memory: "2Gi"
            cpu: "1000m"
#keycloak-service.yaml
apiVersion: v1
kind: Service
metadata:
name: keycloak-service
namespace: improwised-auth
labels:
app: keycloak
spec:
selector:
app: keycloak
ports:
- name: http
port: 80
targetPort: 8080
type: ClusterIP# keycloak-ingress.yaml
apiVersion: networking.k8s.io/v1
kind: Ingress
metadata:
name: keycloak-ingress
namespace: improwised-auth
spec:
ingressClassName: nginx
tls:
- hosts:
- auth.improwised.com
rules:
- host: auth.improwised.com
http:
paths:
- path: /
pathType: Prefix
backend:
service:
name: keycloak-service
port:
number: 80Realm and Client Configuration
Setting Up Authentication in Keycloak
1. Create a New Realm
- Open the Keycloak Admin Console in your browser:
- Log in with your admin account.
- Click “Add Realm” and create a new one named
improwised-production.
This realm will act as a security boundary for your production environment.
2. Add a New Client
A client in Keycloak represents an application that uses Keycloak to handle login and security.
-
Go to Clients → Create
-
Enter the following details:
- Client ID:
improwised-gatekeeper-client - Protocol:
openid-connect
- Client ID:
-
Once created, go to the Settings tab and configure:
- Redirect URLs:
- Web Origins:
- https://*.improwised.com
-
Under Advanced Settings, set:
- Access token lifespan: 30 minutes (1800 seconds)
- Session timeout: 1 hour (3600 seconds)
3. Enable Service Account
Enable the Service Account feature for this client.
This allows secure, automated communication between services — for example, backend-to-backend authentication — without needing a user to log in manually.
4. Add Custom User Information (Token Mappers)
To include user group details in tokens (useful for permissions or role checks), add a Custom Token Mapper:
-
Go to Client → Mappers → Create
-
Fill in the following:
- Name:
improwised-groups - Mapper Type:
Group Membership - Token Claim Name:
groups - Enable:
- Add to ID Token
- Add to Access Token
- Set Full Path:
false
- Name:
Configuring Keycloak Gatekeeper
Basic Gatekeeper Configuration
Create a comprehensive configuration file for Keycloak Gatekeeper:
# gatekeeper-config-configmap.yaml
apiVersion: v1
kind: ConfigMap
metadata:
  name: gatekeeper-config
  namespace: production
data:
  gatekeeper-config.yaml: |
    # Keycloak connection settings
    discovery-url: https://auth.improwised.com/realms/improwised-production/.well-known/openid-configuration
    client-id: improwised-gatekeeper-client
    client-secret: ${KEYCLOAK_CLIENT_SECRET}

    # Security settings
    encryption-key: ${ENCRYPTION_KEY} # 32-byte base64 encoded key
    secure-cookie: true
    same-site-cookie: strict
    enable-security-filter: true
    enable-https-redirection: true

    # Application settings
    listen: 0.0.0.0:3000
    upstream-url: http://improwised-backend-service:8080
    upstream-keepalives: true
    upstream-timeout: 30s

    # Redirect configuration
    redirection-url: https://api.improwised.com
    post-logout-redirect-url: https://improwised.com/logout-success

    # Session management
    enable-session-cookies: true
    cookie-domain: .improwised.com
    cookie-access-name: improwised-access-token
    cookie-refresh-name: improwised-refresh-token
    store-url: redis://redis-service:6379/0

    # Resource protection rules
    resources:
      # Public endpoints (no authentication required)
      - uri: /health
        white-listed: true
      - uri: /metrics
        white-listed: true
      - uri: /api/v1/public/*
        white-listed: true

      # Protected admin endpoints
      - uri: /api/v1/admin/*
        methods:
          - GET
          - POST
          - PUT
          - DELETE
        roles:
          - improwised:admin
          - improwised:super-admin

      # Protected user endpoints
      - uri: /api/v1/user/*
        methods:
          - GET
          - POST
        roles:
          - improwised:user
          - improwised:admin

      # File upload endpoints with size restrictions
      - uri: /api/v1/upload/*
        methods:
          - POST
        roles:
          - improwised:user
        headers:
          Content-Length: "50000000" # 50MB limit

    # Logging and monitoring
    enable-logging: true
    enable-metrics: true
    enable-profiling: true

    # CORS configuration
    cors-origins:
      - "https://app.improwised.com"
      - "https://admin.improwised.com"
    cors-methods:
      - GET
      - POST
      - PUT
      - DELETE
      - OPTIONS
    cors-headers:
      - Authorization
      - Content-Type
      - X-Requested-With
Advanced Security Configuration for Gatekeeper
For production environments, implement additional security measures at the existing configuration:
# gatekeeper-config-configmap.yaml
apiVersion: v1
kind: ConfigMap
metadata:
  name: gatekeeper-security-extension
  namespace: production
data:
  gatekeeper-extra.yaml: |
    # Additional security headers
    headers:
      X-Frame-Options: DENY
      X-Content-Type-Options: nosniff
      X-XSS-Protection: "1; mode=block"
      Strict-Transport-Security: "max-age=31536000; includeSubDomains"
      Content-Security-Policy: "default-src 'self'"

    # Token validation settings
    skip-token-verification: false
    skip-access-token-clientid-check: false
    enable-token-header: true
    skip-authorization-header-identity: true

    # Upstream headers
    response-headers:
      X-Auth-Audience: audience
      X-Auth-Email: email
      X-Auth-ExpiresIn: exp
      X-Auth-Groups: groups
      X-Auth-Roles: realm_access.roles
      X-Auth-Subject: sub
      X-Auth-Token: access_token
      X-Auth-Userid: preferred_username

    # Request filtering
    enable-request-id: true
    request-id-header: X-Request-ID
    enable-compression: true
Service and ConfigMap Resources
Complete the deployment with supporting resources:
# gatekeeper-secret,yaml
apiVersion: v1
kind: Secret
metadata:
  name: keycloak-secrets
  namespace: production
type: Opaque
data:
  client-secret: <base64-encoded-client-secret>
  encryption-key: <base64-encoded-32-byte-key>

# application-service.yaml
apiVersion: v1
kind: Service
metadata:
  name: improwised-app-service
  namespace: production
spec:
  selector:
    app: improwised-app
  ports:
  - name: http
    port: 80
    targetPort: 3000 # Gatekeeper port
  - name: metrics
    port: 9090
    targetPort: 9090
  type: ClusterIP
Kubernetes Integration Strategies
Sidecar Proxy Deployment Pattern
Deploy Gatekeeper as a sidecar container for fine-grained control:
# sidecar-deployment.yaml
apiVersion: apps/v1
kind: Deployment
metadata:
  name: improwised-app-with-auth
  namespace: production
spec:
  replicas: 3
  selector:
    matchLabels:
      app: improwised-app
  template:
    metadata:
      labels:
        app: improwised-app
    spec:
      containers:
      # Main application container
      - name: improwised-backend
        image: improwised/backend-api:v1.2.3
        ports:
        - containerPort: 8080
        env:
        - name: AUTH_ENABLED
          value: "false" # Auth handled by sidecar
        resources:
          requests:
            memory: "512Mi"
            cpu: "250m"
          limits:
            memory: "1Gi"
            cpu: "500m"

      # Keycloak Gatekeeper sidecar
      - name: auth-proxy
        image: quay.io/gogatekeeper/gatekeeper:1.3.0
        ports:
        - containerPort: 3000
        env:
        - name: KEYCLOAK_CLIENT_SECRET
          valueFrom:
            secretKeyRef:
              name: keycloak-secrets
              key: client-secret
        - name: ENCRYPTION_KEY
          valueFrom:
            secretKeyRef:
              name: keycloak-secrets
              key: encryption-key
        volumeMounts:
        - name: gatekeeper-config
          mountPath: /etc/gatekeeper
          readOnly: true
        args:
        - "--config=/etc/gatekeeper/config.yaml"
        resources:
          requests:
            memory: "128Mi"
            cpu: "100m"
          limits:
            memory: "256Mi"
            cpu: "200m"
        livenessProbe:
          httpGet:
            path: /oauth/health
            port: 3000
          initialDelaySeconds: 30
          periodSeconds: 10
        readinessProbe:
          httpGet:
            path: /oauth/health
            port: 3000
          initialDelaySeconds: 5
          periodSeconds: 5

      volumes:
      - name: gatekeeper-config
        configMap:
          name: gatekeeper-config

      # Security context
      securityContext:
        runAsNonRoot: true
        runAsUser: 1000
        fsGroup: 2000
Production Deployment Considerations
High Availability Setup
When deploying to production, you’ll want to ensure your authentication infrastructure can handle real-world traffic patterns and provide uninterrupted service. Here’s how we typically approach this challenge:
Session Storage Configuration
For production environments, centralized session storage becomes critical:
# redis-cluster-statefulset.yaml
apiVersion: apps/v1
kind: StatefulSet
metadata:
 name: redis-cluster
spec:
 serviceName: redis-cluster
 replicas: 7
 selector:
   matchLabels:
     app: redis-cluster
 template:
   metadata:
     labels:
       app: redis-cluster
   spec:
     affinity:
        podAntiAffinity:
          preferredDuringSchedulingIgnoredDuringExecution:
            - weight: 100
              podAffinityTerm:
                labelSelector:
                  matchExpressions:
                    - key: app
                      operator: In
                      values:
                        - redis-cluster
                topologyKey: kubernetes.io/hostname
     containers:
       - name: redis
         image: redis:6.2.5
         command: ['redis-server']
         args: ['/conf/redis.conf']
         env:
           - name: REDIS_CLUSTER_ANNOUNCE_IP
             valueFrom:
               fieldRef:
                 fieldPath: status.podIP
         ports:
           - containerPort: 6379
             name: client
           - containerPort: 16379
             name: gossip
         volumeMounts:
           - name: conf
             mountPath: /conf
           - name: data
             mountPath: /data
      volumes:
        - name: conf
          configMap:
            name: redis-config

 volumeClaimTemplates:
   - metadata:
       name: data
     spec:
       accessModes: ['ReadWriteOnce']
       resources:
         requests:
           storage: 10Gi
# redis-cluster-configmap.yaml
apiVersion: v1
kind: ConfigMap
metadata:
name: redis-config
data:
redis.conf: |
bind 0.0.0.0
port 6379
cluster-enabled yes
cluster-config-file nodes.conf
cluster-node-timeout 5000
appendonly yes
dir /data
protected-mode noPerformance Optimization and Caching For Gatekeeper
Update Your ConfigMap before Deploying Gatekeeper
Next, add the following section to the ConfigMap gatekeeper-config-configmap.yaml you created earlier. This will extend your configuration settings:
# Enhanced gatekeeper configuration with caching
store-url: redis://redis-cluster:6379/0
enable-session-cookies: true
access-token-duration: 15m

# Token caching configuration
enable-token-header: true
enable-authorization-cookie: true
enable-encrypted-token: true

# Upstream connection pooling
upstream-keepalives: true
upstream-keepalive-timeout: 60s
upstream-response-header-timeout: 30s
Gatekeeper Setup
# ha-gatekeeper-deployment.yaml
apiVersion: apps/v1
kind: Deployment
metadata:
  name: gatekeeper-ha
  namespace: production
spec:
  replicas: 5
  strategy:
    type: RollingUpdate
    rollingUpdate:
      maxUnavailable: 1
      maxSurge: 2
  selector:
    matchLabels:
      app: gatekeeper
  template:
    metadata:
      labels:
        app: gatekeeper
    spec:
      affinity:
        podAntiAffinity:
          preferredDuringSchedulingIgnoredDuringExecution:
          - weight: 100
            podAffinityTerm:
              labelSelector:
                matchExpressions:
                - key: app
                  operator: In
                  values:
                  - gatekeeper
              topologyKey: kubernetes.io/hostname
      containers:
      - name: gatekeeper
        image: quay.io/gogatekeeper/gatekeeper:1.3.0
        resources:
          requests:
            memory: "256Mi"
            cpu: "200m"
          limits:
            memory: "512Mi"
            cpu: "500m"
        volumeMounts:
        - name: gatekeeper-config
          mountPath: /etc/gatekeeper
          readOnly: true
        readinessProbe:
          httpGet:
            path: /oauth/health
            port: 3000
          initialDelaySeconds: 10
          periodSeconds: 5
          timeoutSeconds: 3
          failureThreshold: 3
        livenessProbe:
          httpGet:
            path: /oauth/health
            port: 3000
          initialDelaySeconds: 30
          periodSeconds: 10
          timeoutSeconds: 5
          failureThreshold: 3
      volumes:
      - name: gatekeeper-config
        configMap:
          name: gatekeeper-config
Deployment with NGINX Ingress Controller
Implement OAuth2 authentication using NGINX ingress annotations:
# nginx-ingress-oauth2.yaml
apiVersion: networking.k8s.io/v1
kind: Ingress
metadata:
  name: improwised-protected-ingress
  namespace: production
  annotations:
    kubernetes.io/ingress.class: nginx
    nginx.ingress.kubernetes.io/force-ssl-redirect: "true"

    # OAuth2 Authentication
    nginx.ingress.kubernetes.io/auth-url: "https://auth.improwised.com/oauth/authorize"
    nginx.ingress.kubernetes.io/auth-signin: "https://auth.improwised.com/oauth/start?rd=$escaped_request_uri"
    nginx.ingress.kubernetes.io/auth-response-headers: "X-Auth-Request-User,X-Auth-Request-Email,X-Auth-Request-Groups"

    # Additional security headers
    nginx.ingress.kubernetes.io/configuration-snippet: |
      more_set_headers "X-Frame-Options: DENY";
      more_set_headers "X-Content-Type-Options: nosniff";
      more_set_headers "X-XSS-Protection: 1; mode=block";

spec:
  tls:
  - hosts:
    - api.improwised.com
    secretName: improwised-tls-secret
  rules:
  - host: api.improwised.com
    http:
      paths:
      - path: /
        pathType: Prefix
        backend:
          service:
            name: improwised-backend-service
            port:
              number: 8080
JWT Token Management and Validation
Understanding JWT Structure in Keycloak
Keycloak issues JWTs with specific claims that Gatekeeper validates. Understanding the token structure is crucial for debugging and custom authorization logic:
{
  "header": {
    "alg": "RS256",
    "typ": "JWT",
    "kid": "keycloak-key-id"
  },
  "payload": {
    "exp": 1694441234,
    "iat": 1694439434,
    "auth_time": 1694439434,
    "jti": "uuid-token-identifier",
    "iss": "https://auth.improwised.com/realms/improwised-production",
    "aud": ["improwised-gatekeeper-client", "account"],
    "sub": "user-uuid",
    "typ": "Bearer",
    "azp": "improwised-gatekeeper-client",
    "session_state": "session-uuid",
    "acr": "1",
    "scope": "openid email profile",
    "email_verified": true,
    "name": "John Doe",
    "preferred_username": "john.doe",
    "given_name": "John",
    "family_name": "Doe",
    "email": "[email protected]",
    "groups": ["improwised:user", "improwised:developer"],
    "realm_access": {
      "roles": ["default-roles-improwised-production", "offline_access", "uma_authorization"]
    },
    "resource_access": {
      "improwised-gatekeeper-client": {
        "roles": ["user", "developer"]
      }
    }
  }
}
Custom JWT Validation Logic
For applications requiring custom token validation beyond Gatekeeper’s capabilities:
# jwt_validator.py - Custom JWT validation for Improwised applications
import jwt
from jwt import PyJWKClient
import requests
import logging
from datetime import datetime, timedelta
from typing import Dict, List, Optional
from functools import lru_cache

class ImprowisedJWTValidator:
   """Enhanced JWT validator for Improwised microservices"""

   def __init__(self, keycloak_url: str, audience: str, realm: str, client_id: str):
       self.keycloak_url = keycloak_url
       self.realm = realm
       self.client_id = client_id
       self.audience = audience
       self.logger = logging.getLogger(__name__)

   @lru_cache(maxsize=1)

   def validate_token(self, token: str, required_roles: List[str] = None) -> Dict:
       """
       Comprehensive token validation with role checking

       Args:
           token: JWT token string
           required_roles: List of required roles for authorization

       Returns:
           Decoded token payload if valid

       Raises:
           jwt.InvalidTokenError: If token is invalid
           PermissionError: If user lacks required roles
       """
       try:
           # Decode header to get key ID
           header = jwt.get_unverified_header(token)
           key_id = header.get('kid')
           print(key_id)
           if not key_id:
               raise jwt.InvalidTokenError("Token missing key ID")

           # Get public key for verification
           jwks_url = f"{self.keycloak_url}/realms/{self.realm}/protocol/openid-connect/certs"
           public_key = PyJWKClient(jwks_url).get_signing_key_from_jwt(token).key
           print(public_key)

           # Verify and decode token
           payload = jwt.decode(
               token,
               public_key,
               algorithms=['RS256'],
               audience=self.audience,
               issuer=f"{self.keycloak_url}/realms/{self.realm}",
               options={
                   "verify_signature": True,
                   "verify_exp": True,
                   "verify_iat": True,
                   "verify_aud": True,
                   "verify_iss": True
               }
           )
           print("verified")

           # Validate token freshness (additional security check)
           auth_time = payload.get('auth_time')
           if auth_time:
               auth_datetime = datetime.fromtimestamp(auth_time)
               max_age = timedelta(hours=8)  # Configurable max session age

               if datetime.now() - auth_datetime > max_age:
                   raise jwt.InvalidTokenError("Token authentication too old")

           # Check required roles if specified
           if required_roles:
               user_roles = self._extract_user_roles(payload)
               missing_roles = set(required_roles) - set(user_roles)

               if missing_roles:
                   raise PermissionError(f"Missing required roles: {missing_roles}")

           # Log successful validation for audit
           username = payload.get('preferred_username', 'unknown')
           self.logger.info(f"Token validated successfully for user: {username}")

           return payload

       except jwt.ExpiredSignatureError:
           self.logger.warning("Token has expired")
           raise
       except jwt.InvalidAudienceError:
           self.logger.warning("Token audience mismatch")
           raise
       except jwt.InvalidIssuerError:
           self.logger.warning("Token issuer mismatch")
           raise
       except Exception as e:
           self.logger.error(f"Token validation failed: {e}")
           raise

   def _extract_user_roles(self, payload: Dict) -> List[str]:
       """Extract all user roles from token payload"""
       roles = []

       # Extract realm roles
       realm_access = payload.get('realm_access', {})
       roles.extend(realm_access.get('roles', []))

       # Extract client roles
       resource_access = payload.get('resource_access', {})
       client_access = resource_access.get(self.client_id, {})
       roles.extend(client_access.get('roles', []))

       # Extract groups (if mapped as roles)
       groups = payload.get('groups', [])
       roles.extend(groups)

       return list(set(roles))  # Remove duplicates

   def refresh_token(self, refresh_token: str) -> Dict:
       """Refresh access token using refresh token"""
       try:
           token_url = f"{self.keycloak_url}/realms/{self.realm}/protocol/openid-connect/token"

           data = {
               'grant_type': 'refresh_token',
               'refresh_token': refresh_token,
               'client_id': self.client_id
           }

           response = requests.post(token_url, data=data, timeout=10)
           response.raise_for_status()

           return response.json()

       except requests.RequestException as e:
           self.logger.error(f"Token refresh failed: {e}")
           raise
# Usage example
def validate_request_token(request_headers: Dict, required_roles: List[str] = None) -> Dict:
"""Validate JWT token from HTTP request headers"""
auth_header = request_headers.get('Authorization', '')
if not auth_header.startswith('Bearer '):
raise ValueError("Missing or invalid Authorization header")
token = auth_header[7:] # Remove 'Bearer ' prefix
validator = ImprowisedJWTValidator(
keycloak_url="https://auth.improwised.com",
realm="improwised-production",
client_id="improwised-gatekeeper-client",
audience="user"
)
return validator.validate_token(token, required_roles)
# Flask application example
from flask import Flask, request, jsonify
app = Flask(__name__)
@app.route("/")
def home():
return jsonify({"message": "Flask is running!"})
@app.route('/api/v1/secure-endpoint')
def secure_endpoint():
"""Example secured endpoint with role-based access control"""
try:
# Validate token and check for admin role
payload = validate_request_token(
request.headers,
required_roles=['improwised:admin']
)
return jsonify({
'message': 'Access granted',
'user': payload.get('preferred_username'),
'roles': payload.get('groups', [])
})
except (jwt.InvalidTokenError, PermissionError) as e:
return jsonify({'error': str(e)}), 401
except Exception as e:
return jsonify({'error': 'Internal server error'}), 500
if __name__ == "__main__":
app.run(host="0.0.0.0", port=5000, debug=True)Token Introspection and Validation
For high-security environments, implement token introspection:
# Token introspection example using curl
curl -X POST \
  'https://auth.improwised.com/realms/improwised-production/protocol/openid-connect/token/introspect' \
  -H 'Content-Type: application/x-www-form-urlencoded' \
  -d 'token=YOUR_ACCESS_TOKEN&client_id=improwised-gatekeeper-client&client_secret=YOUR_CLIENT_SECRET'
Security Best Practices
Network Security Configuration
Implement comprehensive network security measures:
# network-policy.yaml - Kubernetes Network Policy for Gatekeeper
apiVersion: networking.k8s.io/v1
kind: NetworkPolicy
metadata:
  name: gatekeeper-network-policy
  namespace: production
spec:
  podSelector:
    matchLabels:
      app: improwised-app
  policyTypes:
  - Ingress
  - Egress
  ingress:
  # Allow traffic from ingress controller
  - from:
    - namespaceSelector:
        matchLabels:
          name: ingress-nginx
    ports:
    - protocol: TCP
      port: 3000
  # Allow traffic from monitoring
  - from:
    - namespaceSelector:
        matchLabels:
          name: monitoring
    ports:
    - protocol: TCP
      port: 9090
  egress:
  # Allow DNS resolution
  - to: []
    ports:
    - protocol: UDP
      port: 53
  # Allow HTTPS to Keycloak
  - to:
    - namespaceSelector:
        matchLabels:
          name: auth-system
    ports:
    - protocol: TCP
      port: 443
  # Allow Redis connection
  - to:
    - podSelector:
        matchLabels:
          app: redis
    ports:
    - protocol: TCP
      port: 6379
Secret Management Best Practices
Implement proper secret rotation and management:
# secret-rotation-cronjob.yaml
apiVersion: batch/v1
kind: CronJob
metadata:
  name: rotate-gatekeeper-secrets
  namespace: production
spec:
  schedule: "0 2 * * 0"
  jobTemplate:
    spec:
      template:
        spec:
          restartPolicy: OnFailure
          containers:
          - name: secret-rotator
            image: bitnami/kubectl:1.27
            env:
              - name: KEYCLOAK_ADMIN_URL
                value: "https://auth.improwised.com"
              - name: KEYCLOAK_ADMIN_USER
                valueFrom:
                  secretKeyRef:
                    name: keycloak-admin-secret
                    key: username
              - name: KEYCLOAK_ADMIN_PASSWORD
                valueFrom:
                  secretKeyRef:
                    name: keycloak-admin-secret
                    key: password
              - name: CLIENT_ID
                valueFrom:
                  secretKeyRef:
                    name: keycloak-client-secret
                    key: client-id
            command: ["/bin/bash", "-c"]
            args:
            - |
              set -euo pipefail
              # Generate secret, update Keycloak & K8s secret
              NEW_SECRET=$(openssl rand -base64 32)
              ADMIN_TOKEN=$(curl -s -X POST "${KEYCLOAK_ADMIN_URL}/realms/master/protocol/openid-connect/token" \
                -d "username=${KEYCLOAK_ADMIN_USER}" \
                -d "password=${KEYCLOAK_ADMIN_PASSWORD}" \
                -d 'grant_type=password' \
                -d 'client_id=admin-cli' | jq -r .access_token)

              kubectl patch secret keycloak-client-secret -n production \
                -p "{\"data\":{\"client-secret\":\"$(echo -n ${NEW_SECRET} | base64)\"}}"

              kubectl rollout restart deployment/improwised-app-with-auth -n production
SSL/TLS Configuration
Ensure end-to-end encryption with proper certificate management:
# cert-manager-issuer.yaml
apiVersion: cert-manager.io/v1
kind: ClusterIssuer
metadata:
  name: letsencrypt-production
spec:
  acme:
    server: https://acme-v02.api.letsencrypt.org/directory
    email: [email protected]
    privateKeySecretRef:
      name: letsencrypt-production
    solvers:
    - http01:
        ingress:
          class: nginx
Runtime Security Monitoring
Implement comprehensive monitoring for authentication events:
# monitoring-config.yaml
apiVersion: v1
kind: ConfigMap
metadata:
  name: gatekeeper-monitoring
data:
  prometheus.yml: |
    global:
      scrape_interval: 15s
      evaluation_interval: 15s

    scrape_configs:
      - job_name: 'gatekeeper'
        static_configs:
          - targets: ['gatekeeper-service:3000']
        metrics_path: /metrics

      - job_name: 'keycloak'
        static_configs:
          - targets: ['keycloak-service:8080']
        metrics_path: /metrics

  alerts.yml: |
    groups:
      - name: authentication
        rules:
          - alert: HighFailedLoginRate
            expr: rate(gatekeeper_login_failures_total[5m]) > 10
            for: 2m
            labels:
              severity: warning
            annotations:
              summary: "High authentication failure rate detected"
              description: "Authentication failures have exceeded 10 per minute"

          - alert: TokenValidationErrors
            expr: rate(gatekeeper_token_validation_errors_total[5m]) > 5
            for: 1m
            labels:
              severity: critical
            annotations:
              summary: "JWT token validation errors"
              description: "Multiple token validation failures detected"
Troubleshooting Common Issues
Through our experience implementing OAuth2 authentication across dozens of projects, we’ve encountered and solved many common issues. Here are the most frequent problems and their solutions:
Authentication Flow Issues
Problem: Users get redirected in infinite loops
Solution: Check your redirect URIs and ensure the redirect-url in Gatekeeper matches exactly what’s configured in Keycloak. Pay special attention to trailing slashes and HTTP vs HTTPS schemes.
# Debug redirect configuration
kubectl logs deployment/gatekeeper-ha -f | grep -i redirect

# Verify Keycloak client configuration
curl -s "https://auth.improwised.com/realms/improwised-production/.well-known/openid-configuration" | jq '.authorization_endpoint'Problem: Token validation fails intermittently
Solution: This usually indicates clock synchronization issues between services. Ensure all containers use NTP and consider adding clock skew tolerance:
# Add to gatekeeper config
skip-token-verification: false
token-validation-leeway: 30s # Allow 30 seconds clock skew
Network Connectivity Problems
Problem: Gatekeeper can’t reach Keycloak
Solution: Verify DNS resolution and network policies:
# Test DNS resolution from gatekeeper pod
kubectl exec -it deployment/gatekeeper-ha -- nslookup auth.improwised.com

# Check network policies
kubectl get networkpolicies -n production
kubectl describe networkpolicy gatekeeper-network-policy
SSL Certificate Issues
Problem: SSL verification failures
Solution: Ensure proper certificate chain validation:
# Add to gatekeeper config for development (NOT production)
skip-upstream-tls-verify: false
tls-ca-certificate: /etc/ssl/certs/ca-certificates.crt

# For custom CAs
tls-ca-key: /etc/certs/custom-ca.crt
Session Management Problems
Problem: Users randomly logged out
Solution: Check Redis connectivity and session timeout configuration:
# Verify Redis connection
kubectl exec -it deployment/gatekeeper-ha -- redis-cli -h redis-cluster ping

# Check session configuration
grep -E "(session|cookie)" /etc/gatekeeper/config.yaml
Performance Optimization Tips
Resource Allocation Guidelines
Based on our production experience, here are realistic resource requirements:
- Small deployments (< 100 concurrent users): 128Mi RAM, 100m CPU
- Medium deployments (100-1000 users): 256Mi RAM, 200m CPU
- Large deployments (1000+ users): 512Mi RAM, 500m CPU
Monitoring and Alerting Setup
Implement comprehensive monitoring with to catch issues before they impact users:
# grafana-dashboard-config.json
{
 "id": null,
 "uid": "keycloak-gatekeeper-monitoring",
 "title": "Keycloak Gatekeeper Monitoring",
 "schemaVersion": 36,
 "version": 1,
 "editable": true,
 "tags": [
   "keycloak",
   "gatekeeper"
 ],
 "timezone": "browser",
 "time": {
   "from": "now-1h",
   "to": "now"
 },
 "refresh": "30s",
 "panels": [
   {
     "id": 1,
     "title": "Authentication Success Rate",
     "type": "stat",
     "datasource": {
       "type": "prometheus",
       "uid": "prometheus"
     },
     "targets": [
       {
         "expr": "rate(gatekeeper_login_success_total[5m]) / (rate(gatekeeper_login_success_total[5m]) + rate(gatekeeper_login_failures_total[5m])) * 100",
         "refId": "A"
       }
     ],
     "fieldConfig": {
       "defaults": {
         "unit": "percent",
         "thresholds": {
           "mode": "absolute",
           "steps": [
             {
               "color": "red",
               "value": null
             },
             {
               "color": "green",
               "value": 90
             }
           ]
         }
       },
       "overrides": []
     },
     "options": {
       "reduceOptions": {
         "calcs": [
           "lastNotNull"
         ],
         "fields": "",
         "values": false
       },
       "orientation": "horizontal",
       "colorMode": "value",
       "graphMode": "none",
       "justifyMode": "center"
     },
     "gridPos": {
       "h": 8,
       "w": 12,
       "x": 0,
       "y": 0
     }
   },
   {
     "id": 2,
     "title": "Token Validation Latency (p95)",
     "type": "timeseries",
     "datasource": {
       "type": "prometheus",
       "uid": "prometheus"
     },
     "targets": [
       {
         "expr": "histogram_quantile(0.95, rate(gatekeeper_token_validation_duration_seconds_bucket[5m]))",
         "refId": "A"
       }
     ],
     "fieldConfig": {
       "defaults": {
         "unit": "s"
       },
       "overrides": []
     },
     "gridPos": {
       "h": 8,
       "w": 12,
       "x": 12,
       "y": 0
     },
     "options": {
       "legend": {
         "displayMode": "table",
         "placement": "bottom"
       },
       "tooltip": {
         "mode": "single"
       }
     }
   }
 ]
}
Conclusion
Implementing OAuth2 authorization with Keycloak and Gatekeeper provides a robust, scalable solution for securing modern applications. This approach offers several key advantages: centralized authentication management, reduced application complexity, and compliance with industry security standards.
The configuration examples and best practices outlined in this guide should give you a solid foundation for implementing enterprise-grade authentication in your Kubernetes environment. Remember that security is an ongoing process – regularly review your configurations, monitor authentication metrics, and stay updated with the latest security patches.
The combination of Keycloak’s comprehensive identity management capabilities with Gatekeeper’s lightweight proxy approach creates a powerful authentication stack that can grow with your organization’s needs. Whether you’re securing a single application or an entire microservices ecosystem, this solution provides the flexibility and security required for modern software development.
At Improwised Technologies, we’ve successfully implemented these authentication patterns across numerous client projects, from startups to enterprise applications handling millions of users. Our team specializes in cloud-native security architectures and can help organizations navigate the complexities of modern authentication systems. If you’re looking to implement robust OAuth2 authentication in your applications or need assistance with Kubernetes security architecture, our platform engineering experts can guide you through the process and ensure your implementation follows industry best practices.
Frequently Asked Question
Get quick answers to common queries. Explore our FAQs for helpful insights and solutions.
Yes, of course! That's one of the best things about using Gatekeeper. OAuth2 and JWT tokens don't matter to your app because it acts as a reverse proxy. Gatekeeper handles all the authentication logic and transmits requests with user information in the HTTP headers. We have used it successfully with Node.js, Python, Java, Go, and even PHP programs that are no longer supported.
In our experiments, Gatekeeper adds 2 to 5 milliseconds of latency to each request since it checks the token. But this extra work is usually worth it because it makes the code for the application easier to comprehend and puts all the authentication features in one place. If your APIs get a lot of traffic (more than 1000 requests per second), you might want to use token caching and connection pooling, like we did in our configuration examples.
Gatekeeper has a lot of characteristics that make it more dependable. Gatekeeper can keep inspecting tokens even if Keycloak is down, as long as the tokens are still good and the public keys are stored in memory. Sessions stay valid for session-based authentication until the timeout that was set for them. But Keycloak needs to be fixed before new logins would operate. We recommend setting up good monitoring and a plan for getting back on your feet after a crisis.
A few frequent issues could trigger random logouts: Issues with storing sessions: Check the connection to Redis and how much RAM it is using. Setting clocks to the same time: Check that all of the services' clocks are set to the same time. Tokens will expire: Look at the settings for how long your Keycloak tokens last. Load balancer issues: If you're using session-based authentication, check sticky sessions.
Yes! There are a variety of ways to change the look of Keycloak. You may customize how login pages, error pages, and email layouts look. To create a unique theme, Setting up a directory for Keycloak themes Changing the CSS and HTML templates Setting up your realm to use the theme you made.
Written by
Annavar Satish
Satish is seasoned DevOps Engineer with strong expertise in CI/CD and cloud-native practices. Experienced with Git, Docker, Kubernetes, K3s, Helm, Rancher, Prometheus, Grafana, and alerting systems to ensure reliable software delivery. Passionate about innovation, I’ve also integrated tools like Frigate, DeepStack, DoubleTake, CompreFace, and IoT technologies to optimize and automate workflows.


June 25, 2026
Why Platform Teams Produce Gatekeepers Instead of Partners
Hussain Gandhi
Author


June 23, 2026
CI/CD, DevOps, or Platform Engineering, Which One Does Your Team Actually Need?
Divya Kathiriya
Author


June 18, 2026
The Real Cost of Tribal Knowledge: How to Audit and Eliminate Operational Risk
Chandan Teekinavar
Author

Optimize Your Cloud. Cut Costs. Accelerate Performance.
Struggling with slow deployments and rising cloud costs?
Our tailored platform engineering solutions enhance efficiency, boost speed, and reduce expenses.